Inspecting Synthetic / Composite Engineered Roof Coverings
I’ll never forget the first time I saw a polymer slate roof covering. I first looked with my binoculars, as I always do before climbing. I was struck by the incredible condition of the “slate” tiles on this very old lake house. However when I went up the ladder, I discovered they were a rubberized material. Since then I have seen many. Although the materials used are very durable; it is the installation that can be problematic. There have been some manufactures that have had issues with their product materials in the past. Most of the newer products are very durable and if installed properly should have a long serviceable life. However it is important that other materials including flashing and fasteners are also durable. We normally refer to these coverings as just “composite” because of the many different materials used like: rubber, plastic, and other polymers. It is much more expensive than conventional roofing materials; however the serviceable life, if installed properly is longer. Composite roof coverings will tend to fade or oxidize over time. If you observe different colors / variations in different areas; that may mean that the shingle bundles were not mixed prior to installing. The installer should mix shingles from different bundles to ensure they are properly blended due to color variations. Special installation requirements are recommended for slopes of 2/12 or less. Composite shingles should not be installed on flat roof surfaces. I have outlined broad recommended guidelines. The specific manufacturer installation recommendations should always be referenced. What should a home inspector be looking for when inspecting composite roof shingles?
- Snow guard devices should be installed
- ½ Plywood is the minimum thickness required for 16” on center rafters, although 5/8” is recommended. 5/8-inch plywood is required for 20” rafter spacing or greater. OSB is not recommended.
- Minimum 1 ½ ” large head ring shanked roofing nails Stainless steel are recommended
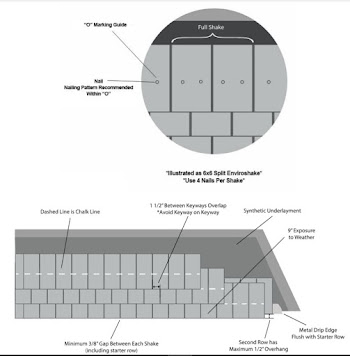
- Nails must be fully covered by shingles and not visible in joints
- Where applicable, only a “pure silicon” sealant should be used to cover up exposed nail heads or to seal joints on ridge caps. The sealant should be color matched
- Every shingle should have 4 nails
- Every cap should have 2 screws
- It is important that the head of the nail not be driven below the top surface of the shake. This may cause leaks in this area.
- The joint between 2 shakes in one course should never be closer than 1 ½” to a joint below or above it.
- A Synthetic underlay is required. Ice / water shield may also be used
- The second course should be installed directly over the starter course, but should project a maximum 1/2″ beyond the starter course (drip edge)
- The exposure should be less than 9 inches (7-7.5 normally). (This will vary depending on the shingle size and manufacture)
- A 24” wide W-flashing (heavy gauge) should be used in the valleys
- Stainless steel flashing is recommended
Related Articles:
- Inspecting Modern Flat / Low Slope Roof Coverings
- Kick out Flashing Requirements
- Solution Series: Roof Venting
- Adding Adequate Roof Ventilation
Want To Learn More? Click HERE to Search Our Full Database Of Home Inspector Newsletters.